October 26, 2009

Let it Snow

I took some time during fall break to try and get my cards done for card club this month. I decided that since Christmas is just around the corner (can you believe it's only 2 months away! Aaah! So not ready . . . ) I decided to do a Christmas card. I love how it turned out!


I stamped the snowflakes across the top of a white piece of paper and embossed swiss dots on the bottom half, and divided it with the cutest red polka dot ribbon ever! I also stamped the wording onto some kraft colored cardstock and used the patterned paper for the rest.


Close up of the focal point. Love it! Ü

October 19, 2009

Make Another Wish

Still loving this card in all colors shapes and sizes!


August 23, 2009

Merci

It felt so good today to be able to have time to sit down and release some pent up creativity. I can't believe it's been 2 months since I've had time to make cards.

I love how this card has a classy, elegant style and only needs one little word to express what I need to say and lets the image say the rest. Ü

June 29, 2009

Random Birthday Card

This is just a silly card that I made for my brother for his birthday. His long standing nickname has been Donut, and so I generally tie that into his birthday cards somehow. Ü This year, I made a play at one of Brian Regan's jokes with the sprinkles smooshed onto one side. Happy Birthday Donut!


June 23, 2009

Celebrate

I've been trying out a few little mosaic pieces. I thought of a friend of mine who absolutely loves neon when making this card. Ü I'm just lovin' my new jungle stamps! (could ya tell?)

June 22, 2009

Variations on a Theme

I have a knack of seriously overusing stuff that I fall in love with. Lol Ü My favorite song gets played over and over and over again until I'm sick of it, my favorite meal gets eaten at least once a week for months at a time, and this card seems to be getting made over and over again until I find a color scheme and shape that I like to go with it - but at least they all look mostly cute, right? No harm in that. Ü Plus it's a quick and easy card that I can throw together in a pinch. Now if only I could find a boy-themed card that I can do that with . . . lol Ü

June 21, 2009

Happy Father's Day!

Just a simple card for my daddy for Father's Day. Ü


June 19, 2009

Welcome Neighbor!

I had way too much fun putting together a gift for my new neighbor (sorry 'old' new neighbors Ü - I'm new to this. Please forgive the lack of cookies on your doorstep after you moved in.)

Anywho, I decided to make some butterscotchies because I thought they looked like a little pile of giraffe spots. hehe. Ü I'd show you a picture - but the rest of them were devoured before I could whip my camera out.

The sentiment inside the card read: "Welcome to the neighborhood - we hope you stay a long time!" Ü (ok, please tell me somebody gets the pun here - *crickets chirp* - blast. giraffe . . . long . . . anybody?) Well, I hope at least the neighbors got it, and if not, I hope they at least enjoyed the cookies. lol. Ü I also included the recipe so they could make them themselves if they wanted and also so that they would know that there's peanut butter in them in case somebody has a little peanut allergy. Ü

Giraffe Spot Cookies (aka Butterscotchies)

1/2 C Peanut Butter
1 - 11 oz pkg Butterscotch chips
6 C corn flakes
melting chocolate

Melt peanut butter with butterscotch chips over medium heat. Remove from heat and stir in corn flakes. Spoon heaps onto wax paper and allow to dry (I use a cookie scoop so that all my cookies are roughly the same size). Melt chocolate in a squeeze bottle and drizzle chocolate over the cookies (can be done before or after they dry). Enjoy!!

May 28, 2009

Hello Baby Giraffe

My best friend Lisa gave me some of the cutest jungle stamps for my birthday! The other day, I finally got a chance to pull them out and play with them. Ü

The little giraffes are so cute! I couldn't resist putting a little glitter on their spots. Ü The zebra stripes on the scalloped circle were a fortunate accident. Ü lol. Fit right in with the little jungle theme (savanna . . . whatever. Ü)

Anyways - I think it turned out pretty cute!

May 25, 2009

Welcome Home

How silly is it that I own a vinyl business and I hardly have any vinyl up in my house? lol. Ü I'm working on it . . . anyways, here's another one I cut out and put up a while ago. I absolutely love the font - I think I searched for it for about 3 hours. lol!


May 23, 2009

Framing a frame

I had a picture hanging in my hall that didn't seem to take up as much wall space as I wanted it to, so I designed a little flourish to 'frame my frame' and make it look a little bigger. I cut it out with black vinyl and stuck it around the frame. I absolutely love how it turned out!


May 21, 2009

Make a wish

My awesome hubby (cough - i ordered them myself, but i still love him ;) ) got me some stamps for my birthday that i've wanted for a while now. this dress is one of them. I absolutely love how the artist took the concept of daisy petals and roses and made a dress out of them.

April 29, 2009

A Better Butterfly


I fixed my butterfly stamp by unmounting it and remounting close to the edges so that I could get a better feel for where I was placing it. For this card, I stamped the main butterfly image in black and then stamped the wings with versamark. I then dusted the versamark with some chalk that I have that matches the ribbon.

March 31, 2009

Simple, 5-minute, anything card

I think that this is one of my favorite cards that I've made. Simple, clean and it can be used for almost any occassion. A thank you card, just a note, a bridal shower, a baby card, a sympathy card, a get well card . . . i think you catch my drift. Ü Not to mention, it's one of those that's easy to put together in a hurry. Granted, I used a duo rubber stamp (instead of an acrylic one that's see-through), so it's not so easy to align the stamps properly (the wings with the whole butterfly image), but I used this stamp for some different cards this month and fixed that problem. I'll post that later for you to see. Ü

March 7, 2009

The Desire To Create Exists In Everyone.

I hate those days when my self talk gets me down. It's so hard to try to make something new and think that it might not be good enough or that someone else's will be better than yours or that you'll never be published or . . . whatever.

Lisa Johnson (a concept designer for a few scrapbooking companies, who totally inspires me) posted this on her blog the other day and thought I'd post it too:


It just gave me that little boost I needed to lift my spirit's today. Ü I hope it does the same for you.

March 6, 2009

Time for Spring Cleaning

I absolutely love getting organized. I like everything to have a place and I like when that everything looks like it belongs. That's why I absolutely love this crafty idea by Becky Oehlers that is not only cheap and easy, but beautiful and stunning!


All she's done is taken some cheap, clear paperholders and decorated them with paper to match her office. Love it! and now I can't wait to make my own! Ü

March 3, 2009

Learning Experience

Ok . . . as embarrasing as some of these are, I like to look at them as reminders of how I've grown since I started making cards. My beginning one's were downright awful! (Especially my first - which I promptly threw away and didn't dare take any pictures of. Lol). ENJOY. =P

February 25, 2009

How to Make Bath Bombs

(ok, ok, I know I said 'soon' and 2 weeks is not soon! Now that I've got my camera fixed, I'm having computer issues! And I also know that this has nothing to do with card making. lol, but it was still fun. Anyways - here they are! Ü)

Bath bombs are composed of a few simple ingredients including a salt that fizzes when placed into water, essential oil for aromatherapy, and olive oil or almond oil to soften the skin; making your bath a wonderfully relaxing and luxurious experience. Ü

My little bath bombs turned out so cute! I hope you have as much fun making them as I did, and even more fun using them in your tub. Ü I made mine peach scented and they smell so good!! My husband and little nephews also think that they are the coolest things ever. (WARNING! Hide your ingredients from your hubby as he may try to steal them to blow up soda bottles. I am NOT kidding. lol).

Ingredients needed:

1 1/2 C. Baking Soda
1 C. Citric Acid
1 t.-1 T. Sodium Lauryl Sulfate (*optional - creates lather)
3-4 T. Oil (coconut, almond, or olive - I used olive)
~10 drops Cosmetic Grade Essential Oil
Colorant
Water or Witch Hazel in a spray bottle
Miniature Muffin Tin
Miniature Cupcake Paper Liners


I found most of the ingredients for a really good price at Majestic Mountain Sage - they also have a lot of other fun homemade bath recipes on their blog that you can make. I read a note somewhere not to use food coloring because it can leave a ring of color in your tub. However, if you use the colorant that I did, use very little! It is extremely potent stuff!


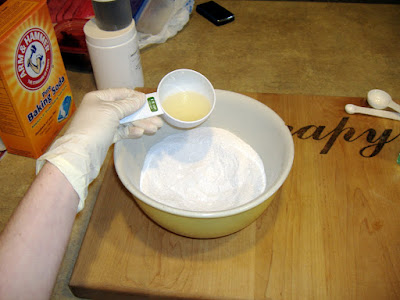
Place all dry ingredients in a nonmetal mixing bowl and mix thoroughly (I used like 1/3 of a 1/4 t. of coloring powder - which you're actually supposed to dilute in water first (oops) and it was still WAY too much. Use teeny tiny amounts). Keep water far away from you! The addition of water to this has the same effect as baking soda and vinegar together - except it smells better, which is what makes is so fun in the tub. Ü


Next, I measured out all of my oils into a separate bowl before pouring into the dry ingredients - you don't want to add too much of your scented oil or you could get a headache when you use the bath bomb, but you should be just fine somewhere around ten drops with this oil. Other oils may require you to use about a teaspoon or so. It really depends on what oil you're using. I'll post some links of other recipes that I found that used different oils.


Pour your oils into the dry ingredients and mix thoroughly. I prefer to mix with my hands, so I donned some rubber gloves to keep from getting the salt under my fingernails.


As you can see here - I put way too much color in! I thought it would be light pink. lol! Ü You want to have the consistency of a dough or pie crust. If it's too dry, you may want to add a little more oil. If it's close, but not quite, give it a spritz or two with water and mix it up (it will fizz a bit) until you get the proper consistency. Too much oil will create a longer drying time or they may not dry at all, which is why the water is used. You know you're there when start getting clumps that don't fall apart after squeezing it in your hands. (as shown above)


I lined my muffin tin with paper liners and starting dropping the mixture by the tablespoonful into each. For equal amounts, I packed a tablespoon full and dumped into each paper. Be sure to press the mixture in tightly. The tighter the pack, the better it will hold to together once it dries. I found that a shot glass fit perfectly into the tin, so I used that press the powder in.


Gently remove your bath bombs and place them in a non-humid area. I used plates so they could be easily maneuvered to wherever I needed to take them. Now they're ready for some cute tops!


I'm actually going to use real frosting for the frosting tops. Ü However, it does NOT taste good! lol.

Royal Icing

3 T Meringue Powder (You can use egg whites, but it doesn't work as well)
5-6 T Water
1/4 t Cream of Tartar
1 lb. Powdered Sugar


Beat the egg whites until you get stiff peaks. Then add your color and scent and beat for another minute. At this point, you can also add 1 tablespoon of either baking soda for fizziness or sodium lauryl sulfate for lather. If you do this, add about another 2 tablespoons of water. I only added coloring to mine.


Then add the powdered sugar. Frosting is ready when it is stiff and fluffy (I should've added a bit more, the frosting wasn't quite as stiff as I wanted it to be - lol Ü)


I'm cheap - I use plastic bags for frosting instead of actually buying frosting bags. lol Ü Just clip off a tiny bit of the end and put in your decorating tip (I used Wilton tip #20) and fill your bag with icing. One batch of royal icing made just enough.


Now's the part where I have to whip out my cake decorating skills that I haven't used in years. Seriously - I found a spatula in my cake decorating box that's been missing for probably 3 years. Lol. And it's been another 5 years on top of that since I took my cake decorating classes! Mmm - I still the smell of my box though. Ü Anyways - to make your cute tops:
  • (You can test this on a peice of paper first if you want a little practice - just scoop the frosting back up and put it in the bag afterwards)
  • hold the bag straight up and down
  • starting from the outside edge at 12 o'clock, circle around the edge of the 'cupcake' and into the middle applying even pressure to the bag
  • release pressure
  • lift straight up
  • voila! cute little cupcake top Ü
  • note: I read a comment on little birdie secrets that says you can use the top as a sugar scrub in the bath, but I haven't tried it myself, so I'm not positive that you won't end up sticky afterwards . . .


Let them sit somewhere safe to dry overnight. The frosting will become hard. Be sure to warn your husband, children, and pets that these are not edible and do not taste good! Unfortunately, I already know of a few people who have fallen prey to cute little cupcakes sitting innocently on the counter and found an unpleasant surprise . . .


Now all that's left it to bag and tag! I put them into clear cellophane bags, tied them with pink ribbon and handed them out a little party favors to my guests at my facial party. Ü (I'd post pictures of us in our mud masks, but I think they'd kill me . . . lol.)

(Note: Making this is basically science mixed with art. Work in small batches and be prepared to tweak a few things as necessary. This post as well as the other links are here for you as a tutorial.to help you make your own if you want. I am not a professional at this and do not claim to know anything Ü)

*makes approximately 3 dozen miniature cupcake bath bombs. For a simpler way, you can pack them into lollipop molds, round molds and/or plastic eggs - make sure you pack them tight so the two halves stick together!

http://planetgreen.discovery.com/fashion-beauty/homemade-bath-bombs.html

http://littlebirdiesecrets.blogspot.com/2008/11/cupcake-bath-bombs-tutorial.html
http://natural-products.suite101.com/article.cfm/homemade_bath_bombs

February 4, 2009

Bath Bombs!

I am so excited!!! I found a recipe for these adorable cupcake bath bombs (and the picture) on Little Birdie Secret's Blog. Ü Aren't they cute?!? I'm going to make some (if I have time) for a little facial/fondue party I'm having on Friday as little party favors. I can't wait!! I've done some research and changed Little Birdie's recipe around a bit (her's is more for long lasting one's that you can sell and ship and what not - I don't need all that extra stuff Ü) So keep your eyes peeled for a post on these to be coming soon!!

January 18, 2009

How to Make the Most of Your Stamps


(I finally figured out why my pictures are so fuzzy - there's a smudge on my camera lens the size of timbuktu! Sorry about the crappy pics!)...

I LOVE paper! I can never seem to get enough of it . . . and then I treasure it. It's all just too pretty! And, knowing that I am queen of making mistakes, I don't want to ruin it with some hideous project that looked so cute in my head and . . . not so cute in real life. Regardless, I'm sure you all can imagine my husband's face when he saw that I was stamping my OWN paper, using a plain white sheet of cardstock, instead of using one of the fabulous one's I already have. LOL! Ü

With that being said, I was rummaging through all of my poorly neglected scrapping supplies and stumbled over some stamps that I had no idea what to do with when I bought them. However, as soon as my eyes passed over this stamp, I knew exactly what to do with it today!


This stamp comes from one of the first sets of acrylic stamps that I bought and I absolutely love it in this setting! I knew it had to be in a fabulous color, so I pulled out Robin's Egg Blue from Close to my Heart (which is still in awesome shape considering how old it is - lol) and just stamped around a piece of white cardstock in no particular pattern.


Didn't it turn out so cute?!? Ü So I decided that I would make a whole bunch of it and use it for card club next month.


To start, I punched out ovals with my new Nestabilities oval dies on my homemade paper and on this bazzil textured coral cardstock from Making Memories - I have TONS of it, so I'm always looking for excuses to use it. lol. I finally got smart and drew a grid on my cutting plate so that all of my ovals would be centered on the cardstock. If you don't mind drawing on your plates, I would highly recommend doing so! It helped a ton. Ü (I also marked the center lines on my straight-edged ovals so that they would be straight when cut on the paper).

I decided to make a birthday card using an old ice cream cone stamp. (Seriously - this stamp used to be my grandma's! I don't even know who made it). The only problem is that I have that hardest time centering rubber stamps! (Especially when the stamp itself doesn't line up with the image on the block). So, I put some adhesive on two small pieces of paper that were the same height (about 1 inch) and stuck them on the block just touching the edge of the rubber. Then I drew a center line down the papers so that I could line it up properly on the card. Next, I positioned my card on my plate (if you look closely, there are little tick marks where each edge of the card should go) and centered the stamp over with card (without ink on it). I made little tick marks on my plate where the edge of the little pieces of paper should go so that I don't have to waste my time trying to position the stamp later.


I inked up my stamp, matched up the center lines and the tick marks, and *voila!* a perfectly centered ice cream cone! (I was quite proud of myself Ü). You can see a little bit better in this picture where all of my tick marks are. They really help to speed up the process, especially when you're mass producing cards. I wanted to place a smaller ice cream cone in the windows on the sides, but, alas, I don't exactly have a small ice cream cone. So, in my pondering (more like kicking myself - why did I do that! You see? I have this knack for ruining fabulous pieces of paper because I just do things on a whim - I don't entirely think them through) anyhow - I remembered this fabulous technique that I learned forever ago called masking. Eureka! Problem solved . . . and it better work! lol Ü


I shifted my card over so that the edge of the card matched up with the center line and made a few more tick marks on the plate to adjust my centering. Then, using a black stamp marker, I inked just the top portion of the ice cream cone and stamped on the edge of the card. Make sure you put a piece of scrap paper underneath the card so you don't end up inking your plate. Ü You can see what it turned out like on the left window of the card.


Next, I created a mask for my ice cream cone by stamping the top portion of my cone onto masking paper (basically a large piece of masking tape). Then I cut out the mask and placed it on top of the image that I'd already stamped on the card.


After getting my mask placed on the card, I inked up just the bottom portion of the cone, lined it up with the tick marks and stamped. You don't need to worry about any of the cone getting on the ice cream because the mask is protecting it.


Repeat on the opposite side, take off the mask, and let dry. Now they're ready to color!


I used markers from Close to my Heart for the cone and the cherry, but oh how I wish I had a set of Copic markers! They seem to blend so much better. Anyway, after coloring those, I took a blue crayola marker and traced around the edge of the ice cream, then I took a water/blending pen and bled the ink into the center.


After swirling the color around and letting it bleed, I blotted it with a towel and stuck it under a book to dry flat. lol. Of course I didn't think to use water color paper that wouldn't warp. Putting it under a book worked though and it turned out fine.


I printed out a happy birthday sentiment from my computer because I'm not cool enough to have a stamp that says 'happy birthday' yet. lol. Ü After printing, I cut it out, poked 3 little holes in the bottom right corner to give it a little 'something', and punched out slots on the sides so I could thread ribbon through it. Now all that's left is putting it together! I cut out some clear paper and placed it underneath the windows. (That way, there's something of substance where I cut out the windows instead of a gaping hole. Ü lol)


For those that read this earlier, you may note a few changes. My little sis came over and said the coral didn't look good with it, so we just threw it out. Ü (ok - not literally - I save everything! but we decided to let the pretty paper show instead. One of these days I'll find a use for the coral)

Aren't they cute?! I'm rather quite proud of myself for just having pulled that out of my head. lol. ok - I did have a little help with the layout, but nothing else Ü. What do you think?

Supplies and Tools:
Stamps: swirls v:1 by rhonna farrer, Autumn Leaves; ice cream cone, Provo Craft (1991!)
Ink: robin egg blue, black, red velvet, shell pink, fawn, and light, Close to my Heart; vivid blue, Crayola Window Marker
Paper: white, Making Memories, translucent paper, ?
Other: small and large oval nestabilities, small and large scalloped oval nestabilities, Spellbinders; polka-dot aqua ribbon, American Crafts; font - Sarah Caps; water pen, ?; big shot die cutting machine, Elison; ribbon slot punch, Making Memories