
(ok, ok, I know I said 'soon' and 2 weeks is not soon! Now that I've got my camera fixed, I'm having computer issues! And I also know that this has nothing to do with card making. lol, but it was still fun. Anyways - here they are! Ü)
Bath bombs are composed of a few simple ingredients including a salt that fizzes when placed into water, essential oil for aromatherapy, and olive oil or almond oil to soften the skin; making your bath a wonderfully relaxing and luxurious experience. Ü
My little bath bombs turned out so cute! I hope you have as much fun making them as I did, and even more fun using them in your tub. Ü I made mine peach scented and they smell so good!! My husband and little nephews also think that they are the coolest things ever. (WARNING! Hide your ingredients from your hubby as he may try to steal them to blow up soda bottles. I am NOT kidding. lol).
Ingredients needed:
1 1/2 C. Baking Soda
1 C. Citric Acid
1 t.-1 T. Sodium Lauryl Sulfate (*optional - creates lather)
3-4 T. Oil (coconut, almond, or olive - I used olive)
~10 drops Cosmetic Grade Essential Oil
Colorant
Water or Witch Hazel in a spray bottle
Miniature Muffin Tin
Miniature Cupcake Paper Liners

I found most of the ingredients for a really good price at Majestic Mountain Sage - they also have a lot of other fun homemade bath recipes on their blog that you can make. I read a note somewhere not to use food coloring because it can leave a ring of color in your tub. However, if you use the colorant that I did, use very little! It is extremely potent stuff!

Place all dry ingredients in a nonmetal mixing bowl and mix thoroughly (I used like 1/3 of a 1/4 t. of coloring powder - which you're actually supposed to dilute in water first (oops) and it was still WAY too much. Use teeny tiny amounts). Keep water far away from you! The addition of water to this has the same effect as baking soda and vinegar together - except it smells better, which is what makes is so fun in the tub. Ü

Next, I measured out all of my oils into a separate bowl before pouring into the dry ingredients - you don't want to add too much of your scented oil or you could get a headache when you use the bath bomb, but you should be just fine somewhere around ten drops with this oil. Other oils may require you to use about a teaspoon or so. It really depends on what oil you're using. I'll post some links of other recipes that I found that used different oils.
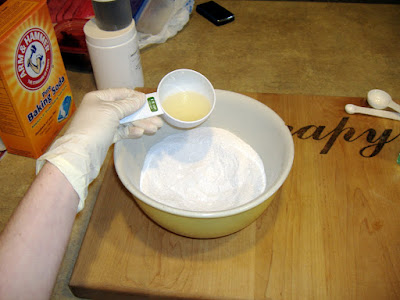
Pour your oils into the dry ingredients and mix thoroughly. I prefer to mix with my hands, so I donned some rubber gloves to keep from getting the salt under my fingernails.

As you can see here - I put way too much color in! I thought it would be light pink. lol! Ü You want to have the consistency of a dough or pie crust. If it's too dry, you may want to add a little more oil. If it's close, but not quite, give it a spritz or two with water and mix it up (it will fizz a bit) until you get the proper consistency. Too much oil will create a longer drying time or they may not dry at all, which is why the water is used. You know you're there when start getting clumps that don't fall apart after squeezing it in your hands. (as shown above)

I lined my muffin tin with paper liners and starting dropping the mixture by the tablespoonful into each. For equal amounts, I packed a tablespoon full and dumped into each paper. Be sure to press the mixture in tightly. The tighter the pack, the better it will hold to together once it dries. I found that a shot glass fit perfectly into the tin, so I used that press the powder in.

Gently remove your bath bombs and place them in a non-humid area. I used plates so they could be easily maneuvered to wherever I needed to take them. Now they're ready for some cute tops!

I'm actually going to use real frosting for the frosting tops. Ü However, it does NOT taste good! lol.

Beat the egg whites until you get stiff peaks. Then add your color and scent and beat for another minute. At this point, you can also add 1 tablespoon of either baking soda for fizziness or sodium lauryl sulfate for lather. If you do this, add about another 2 tablespoons of water. I only added coloring to mine.

Then add the powdered sugar. Frosting is ready when it is stiff and fluffy (I should've added a bit more, the frosting wasn't quite as stiff as I wanted it to be - lol Ü)

I'm cheap - I use plastic bags for frosting instead of actually buying frosting bags. lol Ü Just clip off a tiny bit of the end and put in your decorating tip (I used Wilton tip #20) and fill your bag with icing. One batch of royal icing made just enough.

Now's the part where I have to whip out my cake decorating skills that I haven't used in years. Seriously - I found a spatula in my cake decorating box that's been missing for probably 3 years. Lol. And it's been another 5 years on top of that since I took my cake decorating classes! Mmm - I still the smell of my box though. Ü Anyways - to make your cute tops:

Let them sit somewhere safe to dry overnight. The frosting will become hard. Be sure to warn your husband, children, and pets that these are not edible and do not taste good! Unfortunately, I already know of a few people who have fallen prey to cute little cupcakes sitting innocently on the counter and found an unpleasant surprise . . .


Next, I measured out all of my oils into a separate bowl before pouring into the dry ingredients - you don't want to add too much of your scented oil or you could get a headache when you use the bath bomb, but you should be just fine somewhere around ten drops with this oil. Other oils may require you to use about a teaspoon or so. It really depends on what oil you're using. I'll post some links of other recipes that I found that used different oils.


As you can see here - I put way too much color in! I thought it would be light pink. lol! Ü You want to have the consistency of a dough or pie crust. If it's too dry, you may want to add a little more oil. If it's close, but not quite, give it a spritz or two with water and mix it up (it will fizz a bit) until you get the proper consistency. Too much oil will create a longer drying time or they may not dry at all, which is why the water is used. You know you're there when start getting clumps that don't fall apart after squeezing it in your hands. (as shown above)

I lined my muffin tin with paper liners and starting dropping the mixture by the tablespoonful into each. For equal amounts, I packed a tablespoon full and dumped into each paper. Be sure to press the mixture in tightly. The tighter the pack, the better it will hold to together once it dries. I found that a shot glass fit perfectly into the tin, so I used that press the powder in.

Gently remove your bath bombs and place them in a non-humid area. I used plates so they could be easily maneuvered to wherever I needed to take them. Now they're ready for some cute tops!

Royal Icing
3 T Meringue Powder (You can use egg whites, but it doesn't work as well)
5-6 T Water
1/4 t Cream of Tartar
1 lb. Powdered Sugar

Beat the egg whites until you get stiff peaks. Then add your color and scent and beat for another minute. At this point, you can also add 1 tablespoon of either baking soda for fizziness or sodium lauryl sulfate for lather. If you do this, add about another 2 tablespoons of water. I only added coloring to mine.

Then add the powdered sugar. Frosting is ready when it is stiff and fluffy (I should've added a bit more, the frosting wasn't quite as stiff as I wanted it to be - lol Ü)

I'm cheap - I use plastic bags for frosting instead of actually buying frosting bags. lol Ü Just clip off a tiny bit of the end and put in your decorating tip (I used Wilton tip #20) and fill your bag with icing. One batch of royal icing made just enough.

Now's the part where I have to whip out my cake decorating skills that I haven't used in years. Seriously - I found a spatula in my cake decorating box that's been missing for probably 3 years. Lol. And it's been another 5 years on top of that since I took my cake decorating classes! Mmm - I still the smell of my box though. Ü Anyways - to make your cute tops:
- (You can test this on a peice of paper first if you want a little practice - just scoop the frosting back up and put it in the bag afterwards)
- hold the bag straight up and down
- starting from the outside edge at 12 o'clock, circle around the edge of the 'cupcake' and into the middle applying even pressure to the bag
- release pressure
- lift straight up
- voila! cute little cupcake top Ü
- note: I read a comment on little birdie secrets that says you can use the top as a sugar scrub in the bath, but I haven't tried it myself, so I'm not positive that you won't end up sticky afterwards . . .

Let them sit somewhere safe to dry overnight. The frosting will become hard. Be sure to warn your husband, children, and pets that these are not edible and do not taste good! Unfortunately, I already know of a few people who have fallen prey to cute little cupcakes sitting innocently on the counter and found an unpleasant surprise . . .
Now all that's left it to bag and tag! I put them into clear cellophane bags, tied them with pink ribbon and handed them out a little party favors to my guests at my facial party. Ü (I'd post pictures of us in our mud masks, but I think they'd kill me . . . lol.)
(Note: Making this is basically science mixed with art. Work in small batches and be prepared to tweak a few things as necessary. This post as well as the other links are here for you as a tutorial.to help you make your own if you want. I am not a professional at this and do not claim to know anything Ü)
(Note: Making this is basically science mixed with art. Work in small batches and be prepared to tweak a few things as necessary. This post as well as the other links are here for you as a tutorial.to help you make your own if you want. I am not a professional at this and do not claim to know anything Ü)
*makes approximately 3 dozen miniature cupcake bath bombs. For a simpler way, you can pack them into lollipop molds, round molds and/or plastic eggs - make sure you pack them tight so the two halves stick together!
http://planetgreen.discovery.com/fashion-beauty/homemade-bath-bombs.html
http://littlebirdiesecrets.blogspot.com/2008/11/cupcake-bath-bombs-tutorial.html
http://natural-products.suite101.com/article.cfm/homemade_bath_bombs
http://planetgreen.discovery.com/fashion-beauty/homemade-bath-bombs.html
http://littlebirdiesecrets.blogspot.com/2008/11/cupcake-bath-bombs-tutorial.html
http://natural-products.suite101.com/article.cfm/homemade_bath_bombs
